
Navigating Flowis efficiently requires familiarity with its interface. This article breaks down the main sections you’ll encounter upon logging in: the top bar, the dashboard, and the left menu. Each section offers unique tools and features designed to streamline your workflow and enhance your user experience. Read on to discover how to make the most of these features and optimize your use of Flowis.

Top Bar
On the far left are the three dots you can use to hide the left menu temporarily. Next to the three dots is always the name of the section you are currently in.
On the right side of the top bar, there are three icons:
- Question mark – contains documentation and tours with a more detailed explanation of each section
- Bell – contains announcements that the administrator has set up for your system
- Profile Icon – when clicked, you will see several sections with different profile settings options, described further in this article
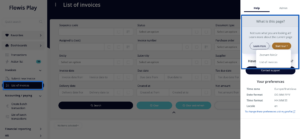
Question Mark
Upon logging in, you may notice some screens automatically launch a tour that explains the available features. To revisit these tours, follow these steps:
- Open the screen for which you want to restart the tour (e.g., List of Invoices).
- Click the question mark icon in the top bar.
- Click the yellow “Start Tour” button.
- Select your preferred language (Slovak or English).
- Follow the tour prompts.
Profile Icon
Clicking on your profile photo or initials reveals several options, including:
- My Profile – allows you to set the details of how each piece of information will be displayed. We recommend that each user fills them out according to their preferences:
- Time zone – all actions on Transactions will be transformed to this time zone. The default is Europe/Bratislava
- Date format – all dates on Transactions will be transformed to this format. The default is MM/DD/YYYY (11/25/2023)
- Time format – all times on Transactions will be transformed to this format. The default is 24 hours with seconds (18:53:21)
- Amount format – all amounts on Transactions will be transformed to this format. The default is EU – 2 decimals (12 345,67)
- Default dashboard – which Dashboard should be seen on the homepage by default
- After action redirect to – after performing an action on Transaction, you can be redirected either to your Action list, to the next Transaction or to stay in the current Transaction’s detail
- Actions sort – select whether you want the actions on Transactions to be sorted form oldest or newest first
- Language (locale) – which language should be used in the tool (to learn more about languages in Flowis, read our article about Translations)
- My favorite paths – when you have something open in Flowis, you can click the “Favorites” tab in the left menu and click “Add favorite”. This will add the current page you have opened into Favorites. In this section of your profile, you can see the list of all your Favorite pages you have, change their order, and delete them if wished.
- Profile picture – upload a .jpeg, .jpg, or .png file that will be shown in the Transaction’s history after hovering over the User’s name. File size mustn’t exceed 10MB. If you do not have a profile picture set up, the initials of your Name will be used.
- My Delegations – delegate authority to another user to ensure timely processing of transactions in your absence.. Learn more about Delegations
- My Downloads – access all files you’ve downloaded, such as reports and invoice attachments.
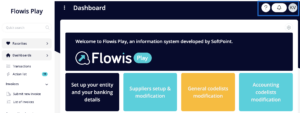
Information Panel
The information panel features your dashboard. If your administrator has set up multiple dashboards, switch between them using the “Dashboards” section in the left menu – clicking on the arrow on the edge of the button will expand a list of all available Dashboards.

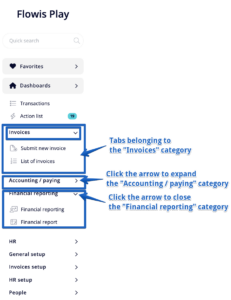
Left Menu
The left menu provides quick links to essential sections and tabs needed for daily operations in Flowis. It remains visible on the side of the screen for easy access. If needed, you can hide it temporarily by clicking the three dots on the left side of the top bar and bring it back using the same method.

Left Menu Content
- Flowis Play Logo: Clicking this logo redirects you to the initial information panel.
- Quick Search: Find specific sections by typing keywords into the search engine.

- Favourite Bookmarks: Access your favorite bookmarks.
- Dashboards: Switch between different dashboards if multiple are available.
- Bookmarks: These are grouped thematically into categories, which can be expanded or collapsed by clicking the arrow at the end of each row.
Understanding the layout and functionality of Flowis is crucial for efficient use. By familiarizing yourself with the top bar, dashboard, and left menu, you can navigate the system with ease and make full use of its features. Whether you’re managing profiles, accessing documentation, or customizing your dashboard, Flowis is designed to streamline your workflow and improve productivity. Start exploring these features today to optimize your experience.
