
Navigating Flowis effectively requires understanding the key differences between Transactions and the Action List. While these sections may appear similar at first glance, they serve distinct purposes. This guide will help you differentiate between them, utilize their features, and optimize your use of Flowis for maximum efficiency.
Transactions vs Action List
In the left menu, there are two items immediately below each other – Transactions and Action List. They may look very similar, but there is a big difference in their content:
- Transactions contain a list of all existing Transactions
- Action List contains a list of only those Transactions that are waiting for your action at a particular step. Your goal should therefore always be to have the Action List empty 🙂
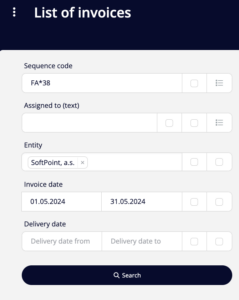
When you open the Transactions or Action List section, you will see a filter at the top of the screen that allows you to find just the Transactions you want to work with. Below the filter, you will find several buttons with additional options for working with Transactions.
Filtering
There are certain procedures that apply to searches, specific to the type of field you are using to search:
- Select from a list of options – start typing and a list of matching options will appear. Click to select the ones you need (example in the picture – the field “Entity”)
- Text box – type the exact search term and only the options that contain exactly what you typed will be displayed. If you don’t want to or don’t know how to search by the exact phrase, you can use asterisks (*) to replace one or more unknown characters (example in the image – the “Sequence code” field)
- Date, Amount – enter the range of values you are looking for (example in the picture – field “Invoice date”)
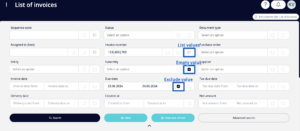
Additional Features in Filter Fields
For some fields in the filter there are additional options that can be checked. What they mean will be displayed if you place the mouse over them for a few seconds without clicking on them. There are 3 options available:
- Exclude value? – all Transactions that contain a value other than the one entered here will be found
- Empty value – those Transactions that contain a blank value in the field will be found
- List values – a modal window will open in which you can enter a new search value in each row (you can use it especially if you are copying values from another file or list)
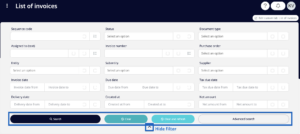
Options in the Filter
- Search – click to search for Transactions that match the data you have entered in the filter
- Clear – all filter fields are cleaned
- Clear and refresh – all filter fields are cleaned and the Transactions list is refreshed (= list of all Transactions is displayed)
- Advanced search – additional filter fields are displayed
- Hide filter – click on the arrow below the buttons to hide the filter, giving you more space to work with the list of Transactions
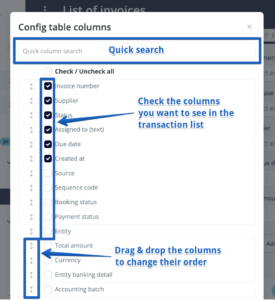
Other Features in the Transaction List
- Customize – customize which columns are displayed in the Transaction list and in what order. Click the customize button and check all the boxes you want to have displayed in the Transaction list. You can use the search bar at the top of the window to find the columns you want more quickly. It is very easy to change the order of the selected columns – just click on the arrow at the beginning of the row of the column to be moved, hold it down and move the entire row to the desired location. When you’re done editing, be sure to save your changes using the button at the very end of the list.
Customizing displayed columns - Download to Excel – Download the list of currently displayed Transactions to Excel. This means that if you have filtered only some Transactions, only those that meet the filtering criteria will be downloaded.
Working with a Transaction
When you open a Transaction, you will see three main sections on the screen:
- Transaction Details,
- a PDF preview of the invoice,
- and the Transaction history.
Transaction Details
The top bar of the screen contains the Transaction sequence code (the internal Flowis invoice code). Next to the sequence code are arrows that can be used to move to the previous or next Transaction.
Below, on the left side of the screen, in the Transaction details, you can see all the necessary information about the invoice. This data can be divided into different sections, which can be hidden if necessary by clicking on the arrow located in front of the section name. The data can also be available in other tabs which can be accessed by clicking on their name.
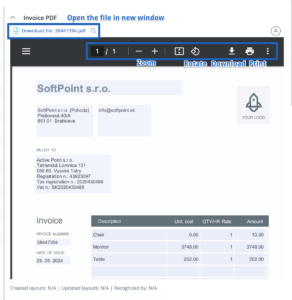
Invoice PDF
On the right side of the screen you can see a preview of the PDF file of the invoice. If you want to open the invoice in a new browser window, click on the blue sign above the invoice preview: ‘Download xxx.pdf file’.
Transaction History
In the Tansaction history, you will see all the actions that have happened to the Transaction either automatically or by other Users. Actions are sorted either from oldest to newest, or vice versa – according to the preference you have set in your Profile. You can also change the order of the actions directly in the Transaction history, by clicking on the blue label with the sort direction in the upper right corner.
For each action, you will see the exact date and time it was performed, as well as which User performed it, what data they changed, or what comments they left on it.
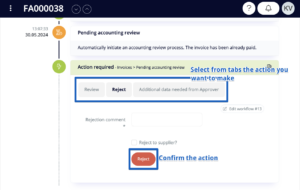
Execution of the Action
If you need to perform an action on a Transaction, scroll to the bottom of the screen and click on the green “Lock transaction and make an action or add a comment” button.
This will open a window with all the action options that you have the right to perform – each action has a separate tabthat you can switch to. Some actions will require certain fields to be completed. Those marked with an asterisk (*) are required. Once all fields have been completed, be sure to confirm the action by pressing the appropriate button.
By mastering the use of both Transactions and the Action List, you can significantly streamline your workflow in Flowis. Whether you’re filtering transactions, customizing your view, or executing specific actions, understanding these tools will enhance your productivity and ensure you stay on top of your tasks. Utilize the features detailed in this guide to make your experience with Flowis both efficient and effective.
