In our Workflows 1 article we learned basic information about Workflows and how to create new Workflow. In our Workflows 2 article we discussed how to work with general Workflow settings. Let’s see what else needs to be thought of when setting up a new Workflow.
Filter transactions (if conditions are met on transaction)
In this section you can set up the conditions that must be met in order to execute the Workflow. You can combine multiple fields to achieve desired output. You can add new filed by selecting one from dropdown in “Add new field”.
In our example, the Workflow can be executed in Transaction Type Invoice, from input Status Pending Invoice approval 1 and if the Document type is Credit note or Invoice.
Don’t check assigned to – this is very important feature which can be used in case that Workflow should be executed by the User even when the Transaction is not assigned to him. Learn more about this in our Workflows 6 article.

System conditions
A place to write Ruby code with specific input conditions that can not be set up in the previous section. Contact your IT administrator to add anything to this section.
Who can perform the action
Authorized group ids – here you can set up which Groups can execute the Workflow. In the Transactions tab or Action list tab we can see these groups in the “Assigned to (text)” field.


Please bear in mind that if you selected “Assign to” option through “Execute communication with systems after the action” in previous step (previous Workflow), leave this section empty, as Transaction is already assigned to the User (from specific Assignment) defined in previous Workflow. Exception for this situation – in case that Workflow should be executed by the Group even when the Transaction is assigned to any other User, “Don’t check assigned to” field must be enabled in “Filter transactions (if conditions are met on transaction)” section. Learn more about this in more details in our Workflows 6 article.
Data types definitions
This section allows the administrator to create new data types that were not specified in Transaction Type and are created only after the Workflow execution. The creation of the data type definition is the same as usual. Learn more about it in our Data Types article.
Copy to to transaction data – data will be copied to the already existing Transaction field.

Action design
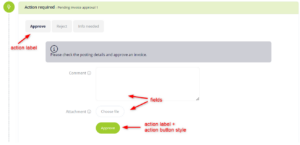
Action label – name of the button
Action button style – color of the button
Show validate button? – a button that will run all the validations and callbacks before executing a Workflow

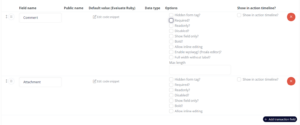
Fields – here you can add fields which will be displayed to the user executing a Workflow. They can be marked as mandatory, optional or set as “readonly” – learn more about all field options in our Data types article.

This is how it looks in Transaction detail. In our example below you can see three buttons – Approve, Reject and Info needed. These are three different Workflows that must be created separately.

Model callbacks, Javascript snippets
Contact your IT administrator to add anything to these sections.
Transaction form behaviour configurations
As mentioned before in Action design, you can set up that after opening the Transaction’s form to execute Workflow, User will see some fields. In this section, you can set up that certain fields will only be displayed to the User if certain conditions are met. These conditions must be first set up in Transaction Form Behaviour Configuration.
Resulting status of the transaction
Resulting status – here you have to set up resulting Status of the Transaction – in other words what status the Transaction will be in after the execution of the Workflow.
Action default comments – you can select from the dropdown the comment which will be automatically added to the Workflow and will be visible on the Transaction’s timeline. You have to predefine it in Action Default Comments.
Comment – If you don’t want to predefine the comment in Action Default Comments, you can simply type the comment in this field. After saving the Workflow, this comment will be added to the comments list in Action Default Comments.

Continue to our Workflows 4 article where we will continue with executing callbacks and then sending an e-mail after the Workflow has been executed.