Sometimes, creating or editing a Transaction or Definition can offer various options and every option requires some other fields to be filled in. The Form behaviour configuration helps to display only relevant fields to the User based on his previous selections.
How to set up Form behaviour?
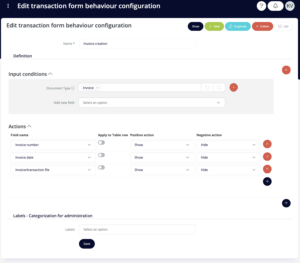
First, you need to set up the name. It will not be visible anywhere for the Users – only for administrators. It is always helpful when the name is self-explanatory and you can guess what the configuration does without having to open it.
The next step is to select definitionable model where should the Form behaviour appear – whether on Transactions or any of the Definitions.
Then you set up the input conditions – what conditions need to be met for the configuration to work. For example, which Transaction Type it is, which Status is the Transaction in, which Document type has to be selected…
And the last, but the most important part is the actions – what should happen if the above set conditions are or are not met. First, you select the Field name to which the behaviour should be applied. If the selected field is part of a Table Data Type, you need to check “Apply to table row”. Positive action says what will happen with a given field if set conditions ARE met. Negative action, on the opposite, says what will happen if set conditions ARE NOT met. There are six options for the actions:
- show – the field will be shown
- hide – the field will be hidden
- readonly – the field will be shown, but cannot be edited
- writeable – the field will be shown and can be edited
- static –
- dynamic –

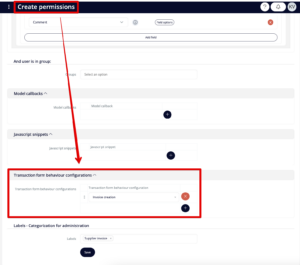
A very important part of the setup is the fact that Form behaviours can be set up for Transaction Type, Create Permissions, Edit Permissions (for both Transactions andDefinitions), or specific Workflows. And they need to be added to those sections if you want them to work – Form behaviours do not work automatically, just by creating them.

Let us show you a simple example of how the above-configured Form behaviour works after you set it up – if you select “Invoice” as a Document type, three additional fields are shown. If any of the other Document types are selected, those three fields hide.

